

Every beautiful machine appliqué is the result of three steps working in harmony: the placement stitch to show you where to position your fabric, the tackdown stitch to hold it, and the final satin stitch to seal the edge. But for that final stitch to do its job perfectly, the fabric piece needs to be cut with precision. It must be just slightly larger than the placement outline, creating the ideal foundation for the stitches that follow. This tutorial moves beyond the basics to focus on that single, crucial detail. We’ll explore the software settings needed to create a perfectly oversized cut file for clean, professional appliqué edges.
In my last blog, BES4 to ScanNCut: Appliqué Cut File from Placement Stitches, I showed you how to use BES4 Dream Edition to create ScanNCut cut files from the placement stitch sequence of the embroidery design. However, there are times when you want the actual cut fabric to be just slightly larger than the placement stitch. You need to resize the appliqué to make sure the edge stitching of the appliqué covers the fabric edge. As a result, the tack down stitch will catch the appliqué and hold it in place. This is especially helpful if you’re not using a pressure sensitive backing on the appliqué .
My first inclination when trying to resize the appliqué was to just increase the size of it by a small amount. This rarely works unless the design is a geometric shape like a square or circle. Just enlarging the design will not cover all parts of the placement stitch evenly. Here’s what I mean:
Every time you sit down at your embroidery machine, you’re connecting with a tradition that stretches back thousands of years. Long before we had computerized machines that could stitch out flawless designs, people were using needles and thread to tell stories, decorate their homes, and create beautiful works of art. From intricate tapestries that chronicled historical events to delicate embellishments on clothing, embroidery has always been a powerful form of personal and cultural expression. It’s a craft that has been passed down through generations, with each culture developing its own unique stitches, patterns, and styles that continue to inspire us.
Thinking about this long history can bring a whole new level of appreciation to your work. The advanced machines we use today, like the ones we help you master here at Rocky Mountain Sewing, are the modern evolution of this ancient art form. They give us the power to create with a precision and speed that artisans of the past could only imagine, but the fundamental spirit of creativity is exactly the same. Exploring these historical styles can be a fantastic source of inspiration for your next project, reminding you that you’re part of a beautiful, enduring global story every time you thread a needle.
One of the richest and most celebrated traditions comes from China, which is home to what are known as the Four Famous Embroideries. These four distinct regional styles, as detailed by China Daily, each contribute a unique chapter to the story of textile art. They are a testament to the incredible skill and artistry that has flourished in the region for centuries, and you can see their influence in design motifs even today.
Before we get into the software specifics, let’s quickly review the core steps of any machine appliqué project. It might seem like magic when the machine is running, but it’s really just a simple, three-part sequence. Understanding this process is key to knowing why resizing your cut file correctly is so important. Each stitch has a specific job, and when they all work together, you get that beautiful, professional finish we’re all after. It’s a dance between the placement stitch, the tackdown stitch, and the final top stitch that brings your design to life.
Think of the placement stitch as the blueprint for your design. It’s the very first thing your embroidery machine will stitch onto your hooped base fabric. This simple running stitch doesn’t hold anything down; its only purpose is to show you exactly where to place your appliqué fabric. As one embroiderer puts it, “A placement stitch is used in embroidery to show you exactly where to put your applique material on your design.” It removes all the guesswork, ensuring your fabric piece lands in the perfect spot before you move on to the next step.
Once you’ve carefully laid your appliqué fabric over the placement stitch outline, the machine gets to work on the tackdown stitch. This is another running stitch, but its job is to secure the appliqué fabric to your base material. After the machine finishes this step, you’ll remove the hoop (but not the fabric!) and carefully trim away the excess appliqué fabric from around the outside of the tackdown stitching. This is where a pair of small, sharp scissors, like appliqué or duckbill scissors, becomes your best friend for getting a close, clean cut without snipping your base fabric.
This is the grand finale. After you’ve trimmed your fabric, you’ll put the hoop back on the machine for the final step. The machine will then sew a decorative stitch, most often a dense satin stitch, that covers the raw edge of your appliqué fabric. This not only hides your trimming and the tackdown stitch but also gives your design a clean, bold, and durable edge. This final stitch is what truly integrates the appliqué piece into the overall design, making it look polished and complete.
Having the right tools on hand before you start is half the battle. Just like baking a cake, you wouldn’t start without flour and sugar, and with appliqué, the right fabric, stabilizer, and thread make all the difference. Setting up your workspace with everything you need means you can focus on the creative process without any frustrating interruptions. A little preparation goes a long way toward ensuring your project is not only successful but also enjoyable from the first stitch to the last.
First, you’ll need your main or “background” fabric properly secured in an embroidery hoop. Then, you’ll have your smaller pieces of colorful fabric for the appliqué itself. But the unsung hero of every embroidery project is the stabilizer. This material supports your fabric, preventing it from puckering or stretching while the machine stitches. Choosing the right stabilizer—like a cut-away, tear-away, or wash-away—depends entirely on your base fabric. If you’re ever unsure, our team at any of our Colorado locations can help you find the perfect match for your project.
Beyond the fabric, a few other items are crucial. You’ll want a good quality embroidery thread that gives a beautiful sheen and won’t shred or break in your machine. You’ll also need a bobbin filled with bobbin thread. As mentioned, small, sharp scissors are non-negotiable for neat trimming. Finally, many crafters use a fusible interfacing, like HeatnBond Lite, on the back of their appliqué fabric. You apply it with an iron, and it provides a bit of stability and temporarily holds the appliqué piece in place, making the whole process even smoother.
For this example I copied the hexagon, then enlarged the copy by 105%. When you align the centers of the two objects, the outline of the larger one is evenly spaced around the outline of the smaller one. This works perfectly for an appliqué to overlap the placement stitch by a little.

Even if a design is symmetrical, just resizing by increasing the overall size will not always result in an appliqué that will be evenly spaced around the placement line. For example, I enlarged this heart by 105%, but when I align the centers of each heart, the larger one is not evenly spaced around the smaller one. See how the lines converge at the “V” of the heart?

Many if not most appliqué designs are irregularly shaped. So just enlarging them will, most likely, not work well. In fact, the more irregular, the more difficulty in aligning the resized appliqué with the placement stitch.
In this example, I selected a design from Anita Goodesign Butterflies and Bees collection. Let’s see the difference between just enlarging the design and creating a contour around the design with BES4.


With the stitch file selected in the new tab, select copy, then paste.
Change the color of the pasted sequence so you can tell it apart from the original sequence.
Select the newly pasted sequence and in properties, under transform, type in a new size for it. Make sure that you are changing the x and y size the same amount by checking maintain aspect ratio. You can change dimensions by checking the absolute box and typing in a new width or length, or check the relative box and increase the size by a certain percent. You only have to change either the length or width. The other dimension will be changed as needed to maintain the aspect ratio.

The result of changing the dimensions of the pasted sequence:

Note that the larger design, the red line is not evenly spaced around the original design, the green line. So if you were to use the red as the cut line for the flower, it would not fit evenly around the placement stitch. In fact, part of the fabric would actually be on the inside the placement stitch.
With other embroidery editing software there might be a selection to create an outline or a contour around a design, and that would be the way to go to create a new cut line that is slightly larger than the placement stitch. I know that in the Floriani FTCu software there is an outline feature to use.
BES4 requires a few extra steps to make the placement stitch sequence a little larger, but still evenly spaced around the design.


 .

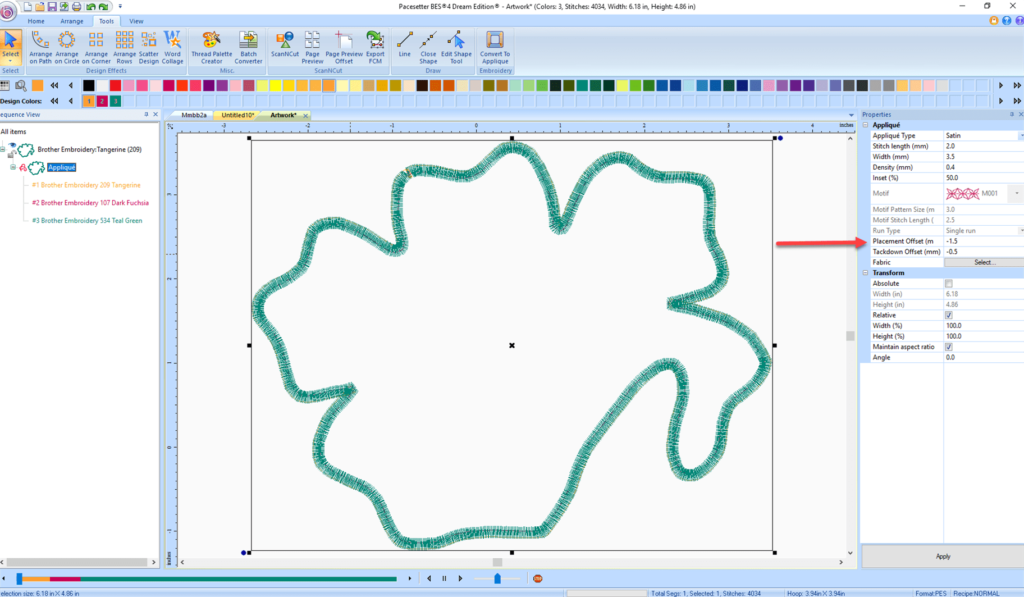


In order to have just the resized placement stitch to send to the ScanNCut you have to “break apart” the appliqué.


When some stitch files are coverted to artwork and then back to stitches, there are often some extra stitches that need to be deleted before sending the design to the ScanNCut.

To delete these in BES4, you have to covert the stitches back to artwork (remember to make sure the thread color is Brother Applique Material (100).
 .


Once you’ve mastered resizing your appliqué shapes, you can start exploring other techniques and software features that give you even more control over your projects. While the steps we covered in BES4 are specific, the underlying concepts apply across different software and situations. Understanding these principles will help you troubleshoot any project and achieve that polished, professional finish we all strive for. It’s all about knowing your tools, both digital and physical, to get the machine to do exactly what you envision. These next few tips are things we often cover in our embroidery classes because they make a huge difference in the final quality of your work.
Sometimes you might work with pre-cut appliqué kits, which can be a great time-saver. Even when the fabric is already cut for you, the placement stitch remains the most critical part of the process. This initial stitch on your base fabric is your non-negotiable guide; it shows you precisely where the fabric piece needs to go. Think of it as the foundation of your design. If the placement stitch isn’t accurate, or if you don’t align your pre-cut piece to it perfectly, the subsequent tackdown and satin stitches will be off. Always take a moment to ensure your fabric piece fits neatly within that stitched outline before you begin the tackdown stitch.
Most embroidery editing programs are packed with features designed to make complex tasks like appliqué easier. While we focused on BES4, you’ll find similar tools in other popular software like Floriani FTCu or Embrilliance. Getting familiar with your software’s specific toolset is a game-changer. It’s worth spending an afternoon just clicking around and seeing what different buttons do. Many programs have built-in manuals or tutorials, and of course, we’re always here at our stores to help you understand the software that comes with your machine. These tools are designed to streamline your workflow and give you more creative freedom.
The technique we used to create a slightly larger cut file is often called creating an outline or contour. Many software programs have a dedicated feature for this, sometimes referred to as an “inset” or “offset” tool. This function automatically generates a new line that is perfectly and evenly spaced around your original shape, which is exactly what you need for a clean appliqué edge. This is especially useful for those tricky, irregular designs where simply scaling the shape up by a percentage just won’t work. Exploring your software’s appliqué object properties will likely reveal this powerful and time-saving feature.
A smart way to make your embroidery process more efficient is by managing your color stops. Some software includes a “Keep Color” or similar option within the appliqué settings. This feature cleverly combines stitches of the same color, meaning the machine won’t stop for a thread change between the placement and tackdown stitches if they use the same thread. While it seems like a small thing, minimizing thread changes saves you a surprising amount of time, especially on a project with multiple appliqué pieces. It keeps your momentum going and helps you finish your projects faster.
As we demonstrated, the final step before cutting is to isolate the new, resized placement stitch. You need to save this single outline as a cutting file (like .FCM for a ScanNCut). This involves breaking the appliqué design apart into its individual components—placement, tackdown, and satin stitch—and deleting the parts you don’t need for the cutter. This step is crucial for precision. Sending the entire multi-part appliqué design to your cutting machine would result in confusion and incorrect cuts. Taking a moment to isolate and save only the cut line ensures your fabric shape is perfect every time.
Creating the perfect appliqué piece is only half the battle; the other half is placing it perfectly on your final item. Where you position your design can make or break the final look. A well-placed embroidery design looks intentional and professional, while one that’s slightly off-center or too high can look like an afterthought. The right placement depends entirely on the item you’re embellishing, whether it’s a sturdy jacket or a delicate hand towel. We recommend printing a template of your design to audition different spots before you ever hoop your fabric. This simple step can save you from a lot of frustration and wasted materials.
When embroidering on clothing, consistency is key. For items like shirts, jackets, or even cuffs, using a standardized placement guide is your best bet for professional-looking results. These guides provide standard measurements, for example, placing a crest on the left chest of a polo shirt or centering a design on the back of a denim jacket. You can find many embroidery placement guides online that offer excellent starting points for all kinds of garments. Using a ruler and a water-soluble marker to mark your center points before hooping will ensure your design lands exactly where you planned it.
Towels and linens present their own unique placement challenges. For plush terrycloth towels, you’ll want to place the design a few inches up from the bottom hem or above the decorative band (the dobby). This ensures the design is visible when the towel is folded or hung. For linens like napkins or placemats, placement might be in a corner or centered, depending on their use. In all cases, the placement stitch is your best friend for confirming the position before the final stitches go down. Given the texture of towels, you’ll also want to use a water-soluble topper to keep the stitches from sinking into the pile, ensuring your beautiful appliqué stays crisp and visible.
Send your design to the ScanNCut once the extraneous points have been deleted.

Click on the Export FCM icon  to save the FCM file for the ScanNCut.
Now see how the new placement stitch (red) is evenly spaced around the original placement stitch (green).

Note, only change the placement stitch for the ScanCut. Do not change it in the original embroidery file.
When you sew out the embroidery file, the placement stitch will be the original placement stitch, but now, the appliqué you cut out with the ScanNCut will be slightly larger than the placement stitch.

As a result you get beautiful appliqués with the edges properly covered by the satin stitch or whatever cover stitch you are using.

Why can’t I just enlarge my appliqué shape by a few percent in the software? That’s a great question, and it seems like the most logical first step. While simply scaling up works for perfect geometric shapes like circles or squares, it doesn’t work for irregular designs like flowers or hearts. When you enlarge an irregular shape, the proportions change unevenly. You might find that the new outline is too far away in some spots and too close (or even overlapping) in others, which defeats the purpose of creating a clean edge for your satin stitch.
Do I need to modify my original embroidery design after creating this new cut file? No, and this is a really important point. You should leave your original embroidery file completely untouched. The larger cut file you create is used only by your ScanNCut to cut the fabric piece. When you go to your embroidery machine, you will still use the original file with its original placement stitch. That stitch acts as your perfect guide, and the slightly oversized fabric piece you cut will fit right over it, giving the final satin stitch the ideal amount of fabric to cover.
What if I don’t use BES4 software? Can I still use this technique? Absolutely. While the specific steps in this tutorial are for BES4, the core concept applies to most embroidery editing software. The key is to look for a feature often called “Contour,” “Outline,” or “Offset.” This tool is designed to create a new line that is perfectly and evenly spaced around your original shape. If you’re using a different program and can’t find the right tool, feel free to stop by one of our stores. We can often help you find the equivalent feature in your software.
Is it really necessary to clean up the extra points before sending the file to my cutting machine? Yes, taking a moment to do this cleanup is well worth the effort. Those tiny, extra points in the digital file can sometimes confuse a cutting machine. They can cause the blade to make small, jerky movements, resulting in a less-than-perfect cut with little nicks or jagged edges on your fabric. Deleting them ensures the software sends a clean, smooth path to your ScanNCut, giving you a flawless fabric shape every time.
Why is this process so important if I’m already using a fusible adhesive on my fabric? Using a fusible product like HeatnBond is fantastic for keeping your appliqué piece from shifting, but it serves a different purpose than resizing the cut file. The adhesive helps with placement and stability. The resizing technique, however, is all about ensuring the final, decorative satin stitch has enough fabric to bite into. This prevents any of the background fabric from peeking through and ensures the raw edge of your appliqué is completely sealed for a durable, professional finish.