Hop To It! Bunny Word Collage Part 2: Appliqué It
Share
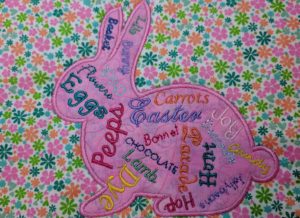
In my previous blog, Hop to It! Make a Bunny Word Collage with FTC-U, I showed you how, in Floriani's FTC-U, to create a word collage inside of a bunny shape. I mentioned that I thought it would be a cute bunny appliqué, and want to show you how to "make it so" in FTC-U.
Convert Artwork to Appliqué
The last step in the blog, Hop to It! Make a Bunny Word Collage with FTC-U, was to convert the bunny outline, which was artwork, to a steil stitch. Now, in order to create an appliqué, we'll remove the steil stitch and create an bunny appliqué. You won't believe how easy it is!
From the opening screen of FTC-U select Open a Design.

Open the saved bunny design in the .waf format.

Select the bunny outline. From our previous session this should be a steil stitch. If it's not a steil stitch, it doesn't matter, as we're going to convert it to an appliqué anyway.

With the bunny outline selected, click on the appliqué icon at the bottom of the screen.

The Bunny Appliqué
When FTC-U creates a appliqué it sets a placement stitch, a tackdown stitch and a finish stitch automatically. You can adjust each of these parameters to your liking in the properties section of the screen under the Appliqué tab.

Note: If you don't have a properties section on your screen, go to Toolbars in the menu and place a check mark byProperties.

Select the type of stitch you want to cover the edge of the bunny appliqué (finish stitch). It can be a satin stitch, a blanket stitch or a motif.

Select the parameters for the appliqué as desired and described below.
Satin Stitch
- Appliqué width (mm): The overall width (side to side) of the satin segment.
- Appliqué density (mm): Stitch density of the segment.
- Appliqué Inset (%): How the satin stitches are placed relative to the segment outline. The default value is 50%, which means that the stitches will be evenly distributed on either side of the outline.
- Corner type: Determines the shape of corners in the segment; select either Round, Sharp, or Bevel.
- Place check marks to create Placement, Tack Down and Finish stitches.

Blanket Stitch
- Appliqué width (mm): enter the width of the Blanket stitching.
- Blanket density (mm) : enter the spacing for the Blanket stitching.
- Place check marks to create Placement, Tack Down and Finish stitches.

Motif Stitch
- Appliqué type: Select a Motif pattern by clicking on the drop down arrow to select stitch that will be used as the appliqué stitching.
- Motif stitch length (mm): The length (width) of each motif pattern.
- Appliqué Inset (%): How the motif stitches are placed relative to the segment outline. The default value is 50%, which means that the stitches will be evenly distributed on either side of the outline.

Appliqué Extra
Click on the Appliqué Extra tab in the properties section to adjust the placement and tack down stitches if desired.
For the Placement stitch:
- Stitch length (mm): Length of the Placement stitch.
- Offset (mm): Distance to move Placement stitch from edge of appliqué.
For the Tack Down stitch
- Type: Select a Run or Zig Zag stitch
- Stitch length (mm): Length of the Tack Down stitch
- Offset (mm): Distance from Placement stitch. Negative number results in offset toward the inside of the appliqué and a positive number will result in the offset stitch toward the outside edge of the appliqué.
If you select a Zig Zag stitch for the Tack Down stitch you can select with Width (mm) and Density (mm) of the zig zag stitch. (Greyed out in the picture below since a Run stitch is selected for the Tack Down.)

Once all parameters are set for the appliqué, click on Apply.
Look at the sewing sequence to see the appliqué steps -- Placement, Tack Down and Finish.

Save the design as a .waf file for further editing if desired.
Ready to Sew
Save the design in the proper format for your embroidery machine, copy to a USB stick, and place the USB stick in your machine.
Sew out the Placement stitch.

Place your fabric over the placement stitch, making sure that it is completely covered.
Sew the Tack Down stitch.

Trim around the bunny, removing the excess fabric from outside the appliqué.

Continue embroidering the rest of the design to complete the bunny appliqué with the word collage.
I sewed the bunny appliqué out with a blanket stitch as the border, and also with a satin stitch as the border. Which do you like better?


Note: I sewed out the blanket stitch version first, and found a few of the words were too small and the word Peeps was repeated. So I edited the text and enlarged some as necessary for the final sew out with the satin stitch border. This is easy to do using the .waf file for the design. I'm pretty happy with the final version.
If you would like the bunny word collage appliqué stitch file to sew out, please email me at rockymountain.blogger@gmail.com. Just let me know what format you need, and I'll send you a copy.
If you have FTC-U, and create a word collage, I'd love to see it! Just post a picture in the comments below. If you don't have FTC-U -- well, you know what Rob would say, "We can do something about that!" Just check with the staff at any of our store locations, and they can fix you right up!